LEED Platinum V4 Wall Design: Building Science
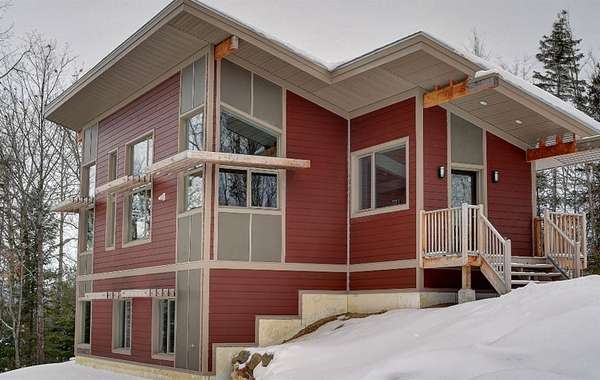
The wall we designed for the Edelweiss house, Canada's first LEED Platinum V4 Home is best categorized as a 'REMOTE' wall, a high performance building envelope developed by the Cold Climate Housing Research Centre in Alaska. REMOTE stands for 'Residential Exterior Membrane Outside-insulation TEchnique'.

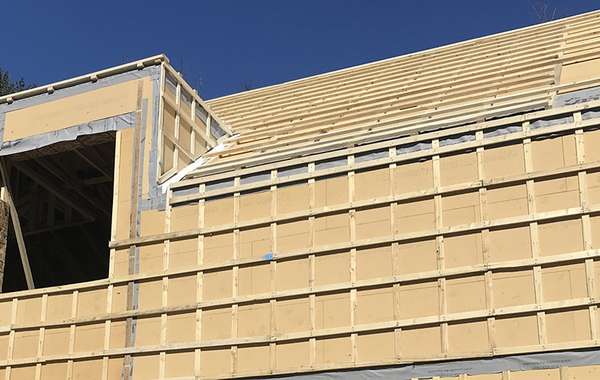
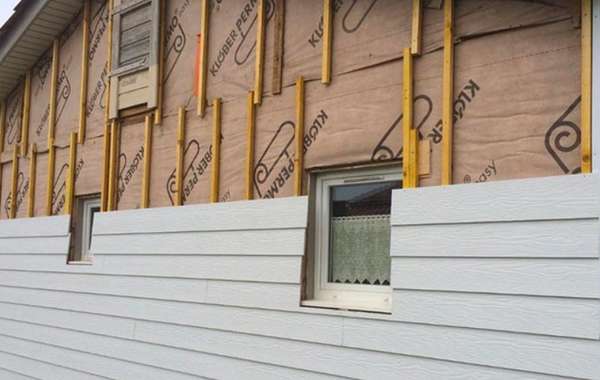
Remote walls are framed the way you would be used to seeing it done with 2x6s and sheathing; the difference is that vapor and air control layers are moved to the exterior of the sheathing, then additional insulation is installed outside of that.
Stud cavities are still insulated with batts, but the majority of insulation is on the outside of the sheathing, this way the vapour control layer is sandwiched between layers of insulation where it can perform best in a wildly varying climate like we have in Canada.
There are many advantages to this system - it provides much greater thermal protection and energy efficiency, better drying capabilities and protects the air barrier from the assault it would normally receive from wiring and other penetrations when we rely on an interior polyethylene as an air and vapor barrier. See our pages on vapor and air movement & the difference between air & vapor barriers to get a better idea of how this works, and why it makes so much sense to build this way in cold climates.
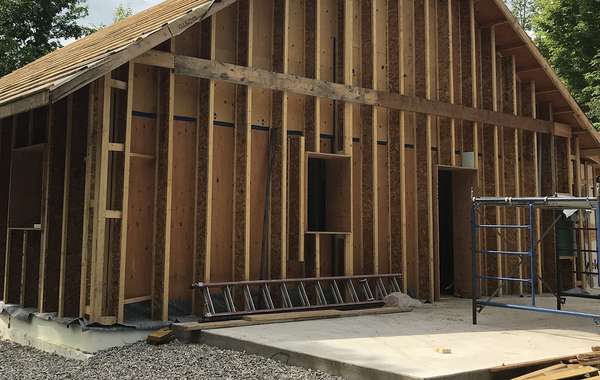
1. After the concrete slab had sufficiently set, we began wall framing. We used detailed framing plans from a local lumber company. Each wall was planned down to the smallest framing member including a cut list with the length of each piece. This made the framing process go fast and efficiently and reduced our waste, as the wood order matched the requirements of the walls.
We used FSC certified wood (Forest Stewardship Council) which is guaranteed to come from sustainably-managed forests and offers additional LEED points.

2. Sheathing was installed leaving a 1/8th inch gap at the seams to provide additional drying capability of the walls, along with providing room for sheathing to expand without buckling. This protects our exterior air barrier membrane and prevents any risk of walls warping.
3. Window openings were built out to allow for the additional exterior insulation. The air barrier was wrapped around the entire window box and into the interior.

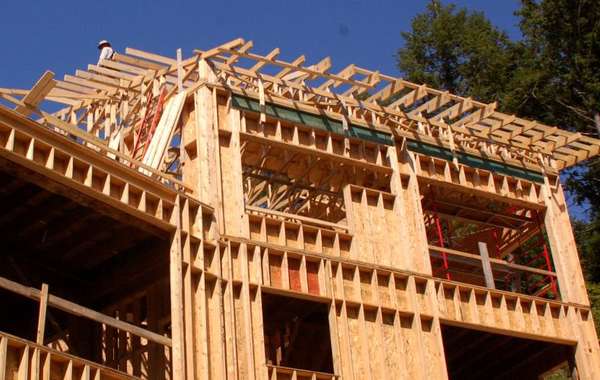
4. Trusses were dropped on top after walls were completed. The trusses we needed for this house were enormous by most standards, for a number of reasons: the long span from north to south (35 feet), the shallow roof pitch (2/12), and the added weight that would be coming in the form of soil for our live roof (green roof). This gave us a deep cavity for insulation, with mineral wool batts totalling R95.
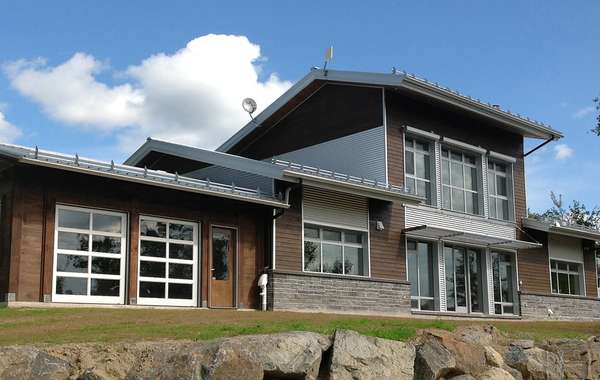
5. The height of the south wall along with the large openings facilitate natural light and passive solar heat gain.
The Ecohome R.E.M.O.T.E. wall
The difference here compared to what is commonly done with the REMOTE wall technique is that we used rigid mineral wool batts instead of polystyrene rigid insulation (EPS or XPS - see comparisons here) .
We chose this option for a variety of reasons. Mineral wool has high embodied energy but the final product is effectively inert, with characteristics that will remain unchanged with the passing of time. This is not the case with polystyrene, which over time will off-gas its blowing agents and cause material shrinkage, reduced thermal performance and the release of climate changing greenhouse gases. Read more here about how to choose the right rigid insulation board.
Furthermore, Roxul, or now Rockwool, contains no fire retardant chemicals such brome-based HBCD (Hexabromocyclododecane, spelling test to follow), a persistent bio-accumulative chemical found in EPS and XPS that is connected to a disturbing amount of human health issues.
Avoiding thermal bridges:
When one section of a wall conducts heat much quicker than another, we refer to it as a thermal bridge, and that can greatly reduce the overall R value of a wall. Virtually every thermal bridge in this wall assembly was identified and addressed in the design phase.
Thermal breaks in exterior insulation:
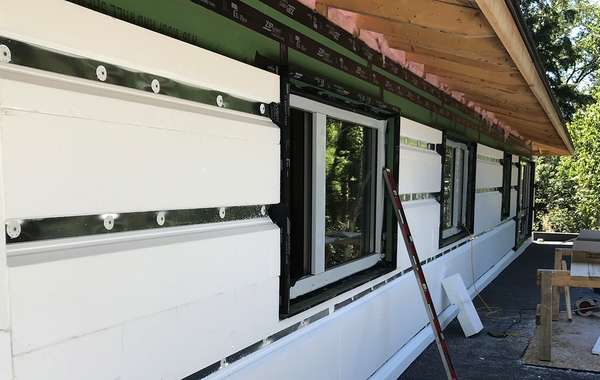
It would have been quicker for us to attach the entire mass of exterior insulation with longer screws and only one course of strapping, but using THERM software, our engineer determined that the cold transmitted through the metal screws would have reduced the effective R-value of the exterior insulation by close to 1/3. Double strapping and screws that don't span the entire wall eliminates that potential thermal bridge without having to invest in expensive insulated attachments.
Something we often hear when discussing this house is the extreme amount of insulation. It certainly can look like overkill when compared to the under-insulated homes that are typical of tract housing projects, as housing developers rely on building code minimum standards to determine efficiency. As performance isn't always high on the radar of home buyers, builders make more money that way, but leave homeowners with unnecessarily high heating bills for the rest of their lives.
In contrast, a hyper-insulated house will save occupants a lot of money over its lifetime, but even on the short term can actually be cheaper to own and operate from the moment you move in, as the added construction costs are offset by greatly reduced operating costs.
In our next post we will outline the reasoning behind this wall design, associated monthly costs, and the concept of the 'sweet spot', which is the optimum level of insulation for a home, proper orientation, and designing for your local climate. There isn't one coat that would serve you well in every part of Canada, houses are the same.
The following diagram details the building envelope design of our LEED V4 Platinum certified Demo House. The drawing is not to scale, but performance values are accurate. Additional note: stud cavities are filled with R24 mineral wool batts.
 |
|
|
Now you know the building science basics, learn more about sustainable home comfort, energy efficiency and how to reduce the carbon footprint of homes on the following pages and in the Ecohome Green Building Guide.
|







Where's the vapour barrier in the wall construction?
Is there insulation in the site built wall
Hi Sam
There is Roxul batt insulation in the stud cavities, but the majority is on the exterior of the sheathing, 8 inches of Roxul Comfortboard. Our air barrier is the Delta SA exterior self adhering membrane, and OSB falls just short of being a vapour barrier, but comes a bit closer when you consider the primer and membrane. We will be using a vapour retarder primer (sometimes called vapour barrier paint) to further slow movement of vapour through the walls. The fact that OSB acts as a vapour retarder is sort of the elephant in the room in the building world, as it means that the standard wall with OSB sheathing and interior poly has effectively, two vapour how. Read more about how to choose between osb and plywood.
It's an unconventional approach considering that the industry almost exclusively relies on 6 mil poly as both an air and vapour barrier, but this actually performs better, offering greater drying capabilities over the course of a full year.
With super insulated homes or any home with air conditioning, during hot humid months the difference in temperatures from indoors to out can cause a reverse vapour drive, so building scientists have long been advocating a different approach, something more vapour open. Vapour barrier paints meet the requirements of building codes, they work fine in winter but much better in summer.
What is the tightness of the building? We have builders using the Prairie Double Wall that have built houses below 0.15 ACh at 50pa. How does this compare? I have not priced it out but I think the Prairie Double Wall is a lot less expensive and less work.
could you do just one layer of exterior insolation?
Probably not. I am assuming that you mean the insulation anchored to the stud wall. The article notes that staggered strapping was used to avoid thermal bridging because of the anchors. It's the depth of the material that provides the insulating performance. An engineering software analysis on the thermal performance showed that the anchors/screws reduced the insulating value of the wall by half. Roxul mineral wool was chosen because it maintains its insulating value over time compared to polystyrene or isocyanurate. Further, wildlife don't like to chew on Roxul.
How could you do this with Cellulose insulation?
Hi Dallas,
You could easily do a dense-packed cellulose wall system as thick as you want to achieve a particular performance goal. This house was done with Roxul but that does not mean it is the only way (or best way), every method has it's pros and cons. Our next demo house will be coming in 2018 and it will most likely be done with dense-packed cellulose walls.
Do you have any diagrams or detail on the window & door openings that you could provide? I am in the process of starting a home this summer and would like to use this wall assembly for our home in Montana.
Hi John, here is our page about How to Install Windows Properly. Best regards.
I have been scouring through your website and have read almost every article and question post. My question for this type of wall is will it be able to handle a exterior cladding as heavy as Hardie board or will extra supports be required.
Thanks for all the work you have done. It has been a great leading resourse.
Hi Lee,
Glad you find it of value, thanks! The wall you see here supports the cladding fine with no sagging, but it was a bit more labour intensive that we woul have liked. As for the added weight of a cement board siding, yes that would be a concern. Were we to do exterior Rock Wool insulation boards again, we would likely go with a fastener like Cascadia Clips, which eliminates the thermal bridging (the reason for our double layer of strapping and insulation in this case) and provides a medium for attaching siding aftwards.
We considered it but decided against it for two reasons - first, we wanted to keep the wall assembly fairly familiar looking to builders and what they are currently constructing, and secondly we found the clips at first a bit expensive. That said, having done it the way we did, the added labour we think would have balanced it out somewhat as well as saving a few headaches. It's all abour trying new stuff and finding the pros and cons through experience, and hindsight is 20/20 they say :)
There is also a product called ThermalWall that is an EPS panel of 6 to 8 inches with a section of insulation that is removed by hand to access attachment rails inside the foam, you then replace that section and attach your siding to the same rails. This system also greatly reduces thermal bridging. There is no problem attaching cement board siding to that as well. All the fasteners are included with it.
This seems like a lot of materials, wraps, massive door jams, etc. When all is said and done getting all these different materials and labor to install it all. Why not just put spray 6" of HFO Polyurethane in the walls and be done with it?
Hi Russell,
Good question, and it's one that a few people have asked us since a couple of companies have started to use the new HFO blowing agents in spray foam. That is a massive improvement in that product, but that switch hadn't happened when we built that house, so even if we wanted to, it wasn't an option that was open to us at the time.
And while the greenhouse gas emissions of spray foam are much better now than they were previously, there is still alot about it we don't like. It's still a petroleum product, there are still chemicals within it that may potentially be quite harmful to humans, and using it over an entire house ensures that at the end of it's life, the components of that house cannot be re-used or recycled. Wooden framing members covered with spray foam have no where to go but the dump.
All the framing lumber, as well as the Rockwool rigid insulation panels and batts in the Edelweiss House wall assembly can be removed and re-used when the house has reached the end of it's life.
There is also a matter of performance; while spray foam has a higher R value per inch than other insulation types, you'd need to do more than build a 2x6 wall and spray foam it to reach the same performance levels of a wall assembly. Thanks for bringing that up, best regards.
Awesome article and video, thanks for putting in the effort to share your methods! Love the website overall too, it's a great resource for builders like myself who want to dive into more sustainable and "green" practises. A couple questions on the above method:
Can you comment on the viability of eliminating the wall sheathing in favour of a series of diagonal metal straps? Seems like a great way to reduce material and waste, with the downside being a lack of solid backing for a vapour retarding membrane to adhere to. I'm assuming that's not a deal breaker though? Likely would require engineering too, but could also reduce overall labour.
The thermal bridging through fasteners is interesting - I've seen lots of writing on installing rockwool to the exterior of buildings in a rain screen application, on standard and double stud wall systems. Are the fasteners in these systems actually negating the effectiveness of the added insulation? Obviously the exact wall construction will vary, but typically there are the nails/screws and washers holding the insulation to the wall, followed by the fasteners that support the 1x strapping. Any insight into this?
Hey Mark, thanks for the feedback, we’re always happy to hear people find the site of value!
Installing diagonal metal strips is called ‘wind bracing’ and it does work fine, and it does reduce the amount of materials you need to buy was well as dispose of.
It does present its own challenges, but that’s the case with many techniques, and some people swear by it and would never install sheathing. Before committing to it I would run it past your local building inspector to make sure they’ll sign off on it.
The one nice thing about solid sheathing is that it give you a nice flat surface for installing an air barrier (as you see in that video) but just means its something you need to plan for.
I’ve done it myself in the past either using 1x3 strapping (which we laid down, chalked lines, cut with circular saw then chipped out the pieces), but less time consuming is the metal straps, just like drywal corners. That’s a really easy install because you chalk a line then run a circular saw along the lines and the metal edge slips right inside.
As for thermal bridging through the fasteners, yes, they do conduct heat. What we did there was an experimental method that worked fine, but in hindsight I would not hesitate to use something like Cascadia Clips (there are other brands but that comes to mind). We thought this might be a bit cheaper and more familiar looking to builders like yourself, but in hindsight I think any material savings were eaten up by more labour, as it meant doing two laps of the house with strapping and rigid insulation panels.
As for negating heat loss, our engineers have conditioned us to never speak in absolutes :-)
So… it helps, it reduces heat loss quite a bit compared to having metal pass through the envelope, but it is not perfect, as nothing in this world is. Its a cumulative effect, and in order to achieve a seriously energy efficient envelope you need to be on all those details because they all add up. Our more recent demo house has dense-packed cellulose walls, that is a great way to get seamless insulation as well. Hope that helps!
Thanks Mike, appreciate the response. I'm in Edmonton AB, looking at potential wall assemblies for infill construction that will help reduce overall carbon emissions. (seem to have landed on either double stud or I-joist as a "Larsen truss", although your remote system is intriguing) One of the interests for me is of course building homes that don't rely so much on fossil fuels to heat and power our lives - obviously this can be a challenge in Alberta, where we are around 90% powered by fossil fuels! I saw somewhere on the site that you guys are in Eastern Canada (Quebec, or Ottawa?), and are largely powered by hydro. With that said, are you heating your high efficiency homes with that renewable electricity, or are the rates/efficiencies cost prohibitive?
My effort will involve some combination of high R-values/ tight air sealing and solar panels. The question I need to answer is how feasible it will be to provide heat and power from one solar array. Ie how much additional power would need to be allocated to domestic hot water and a Legalett air heated slab system, which I would love to try out (which brings up another question - on a two storey house, how much supplementary heat is needed to heat the upstairs, and what system provides it??)
Would be great to build a new home and not have to run a gas line at all, which is almost unheard of here. It's easy to get away from fossil fuels for general electricity needs (solar), but heat and hot water might be another story, unless I go Passive House!
Hi Mike, very interesting video, particularly the idea of breaking up the thermal bridges caused by the fixings using the intermediary layer of furring strips.
I am designing a small self-build dwelling at the moment (ASHRAE climate 5C), with the aspiration to achieve a Passivhaus certification for the build. Due to my limited building experience I would like to use SIPs for the superstructure, the speed of erection in this remote part of the world is very desirable.
My query to you would be, have you ever considered the use of SIPs instead of stick framing with this wall assembly? My concerns are mostly to do with fixings to the OSB sheathing. I would be very interested to know your thoughts on this SIPs variation idea.
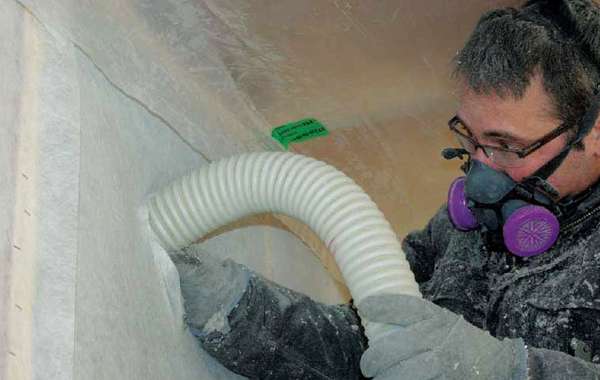
The way we attached the panels worked, but it was a lot of work. In terms of sips, you could go that route, but I'm not sure where to point you to find typical SIPs with rigid EPs interior foam that would be thick enough to meet Passive House performance requirements without having to build an interior wall for additional insulation. There is the option of prefab wall panels of dense packed cellulose or something similar.
You also might want to look at this one that is a bit of a hybrid - Thermalwall exterior rigid insulation panels from Legalett. You can stick frame a building normally and attach them to the outside. They attach with a metal rail in the center of the panel that you screw to the wall, then you replace the ‘snap track’ of foam over the rail, and attach your strapping to the same rail. So it achieves about the same thing as we did -breaking the thermal bridge – but it's done with a whole lot less effort.
They’re also Passive House certified, so that my save you a bit of money as it will save your designer time when they do heat load calculations. That way you could insulate an interior wall with insulation as well and be able to get up around an R50 wall assembly.
I'am wondering if using the rigid insulation inside and outside would help for the length of the screws needed, and less complexity in puting two layers of insulation together? The vapor retarder can still be put at about 1/3 of the insulation.
The composition could be , from the inside : interior finish (gypsum), double straping for wall cavity, Rockwool comfort board on one orientation, vapour retarder, wood studs with insulation, sheating, air barrier, Rockwool comfort board on the other orientation (would it change someting? maby not to align the seams?), straping, exterior finish?
Since the nails or screws could be offset from the rigid insulation on the inside and outside, would that break thermal bridges?
Thank you! I'am looking for a simple, economical yet good R value symtem and aiming for r40 walls (wich could be achieve with 3.5 confortboard on the inside, 2x4 with insulation, sheating, 3.5 confortboard on the outside)
Are you able to send a wall section?